How Do I Play A CD On My Laptop?
Disclosure: This post may contain affiliate links. If you purchase through these links, we may earn a small commission at no extra cost to you.
Playing a CD on your laptop happens to be one of the simplest things you can do. However, there are a few things you have to do right so your laptop can read data from your CD and convert it into a digital format. In any case, here’s everything you need to know to be able to play a CD on your laptop.
Make Sure You Have A Disk Drive
Modern laptops are being manufactured without CD drives, so, first things first, make sure your laptop has a CD drive! Check the sides of the laptop for a slot or a button to eject your CD. Another way to check for a disk drive is to go to the Device Manager and look for CD/DVD-ROM drives.
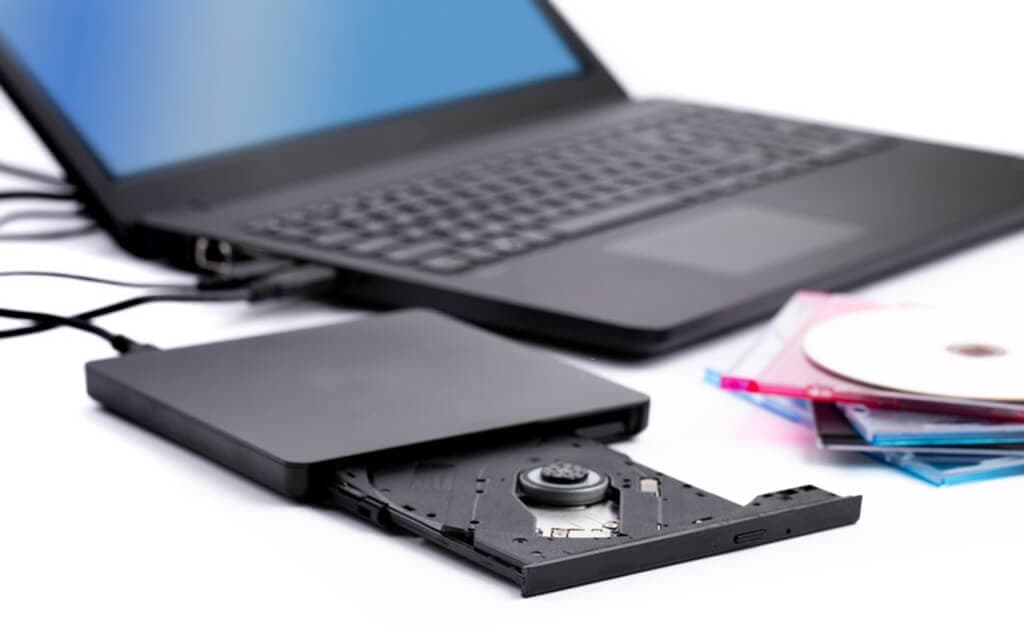
What If You Don’t Have One?
If your laptop doesn’t have a CD drive, you will have to get an external one. Once you have an external CD drive, you just plug it into one of your laptop’s USB ports and you are good to go. (Note: External optical readers are not expensive so you shouldn’t have problems purchasing one.)
There is another option called Remote disk sharing which allows you to access a disk drive over a network. If you have a laptop or a desktop with a disk drive on the same network as your laptop, you can gain access to it. However, this feature may not be available in most laptops because they use copy protection. Still, it’s worth a shot.
Understanding Your Optical Drive Type
There are two types of disk drives available. With the slide-out tray type, you push the Eject button and the tray, well, slides out. You then place your CD on the tray and close it by pressing the Eject button again or by gently pushing it in. The other type of drive has a slot in which you insert your CD. Check out our list of best portable CD player reviews here.
Playing In Windows
After inserting your CD into the drive, you will receive a notification asking you to choose what happens with the CD. If you have already given a command to follow when a CD is inserted, you won’t receive a notification.
Next, you want to click on Play audio CD. If you have multiple media players, they’ll be listed below. At the very least, you should see Windows Media Player. It comes installed in all versions of Windows
If your CD doesn’t support AutoPlay, you will have to go to the media player and set it to play. In the media player, you will find your CD on the left-side menu; double-click on your CD. When you do this, the tracks should populate the middle of the window.
Enabling Windows AutoPlay
If your laptop doesn’t AutoPlay the CD after inserting it, you may have to adjust the AutoPlay settings.
Step 1: Go to the Control Panel.
Step 2: Then go to the AutoPlay option. If you can’t find it, select View from the upper left corner and then select Large icons or Small icons.
Step 3: Go to the CDs section.
Step 4: After this, select the Audio CD drop-down menu.
Step 5: In this menu, you will see various options. Choose the action you want your laptop to take when you insert a CD.
Step 6: Similarly, go to the Enhanced Audio CD drop-down menu. You will see options like Run enhanced content, Play audio CD (Windows Media Player), Take no action, Ask me every time, etc. Choose your desired option.
Step 7: When you have chosen your options click the Save button. You’re all done!
Some Mac laptops have slide-out trays, however, most of them have slots. Before you insert a CD, make sure that it is label-up. If the CD doesn’t play automatically, you have to go to iTunes. In the top row of buttons, you will find a CD button. Click the CD button then click the Play button.
Enabling AutoPlay On Mac
To adjust Mac’s CD defaults:
Step 1: Go to the Apple menu.
Step 2: Click System Preferences.
Step 3: In System Preferences (second section), you will find CDs & DVDs options. Click on it.
Step 4: In the drop-down box, you will see many options. Click on the When to insert a music CD menu.
Step 5: If you have selected iTunes as the default option, you can make iTunes actions more specific. Open iTunes and go to the iTunes menu, then click on preferences. You will find an option that reads When you insert a CD.
Step 6: Select the option you would like your Mac to take when you insert a CD.
Step 7: Click OK, and you are all done.
Ejecting The CD
Once you’re done playing your CD, it is time to take it out of the drive.
The process is fairly easy in the slide-out tray type of drives.
All you have to do is click on the Eject button and the CD will come out. Those with slot drives will find an Eject button on their keyboard.
Additional Troubleshooting Tips
Hopefully, you don’t encounter any problems with playing your CD. However, if a problem does crop up, try to resolve it using one or several of the following tips:
- Reboot your laptop then quickly press the F8 key to initiate Safe mode. As you do this, your laptop may read the CD. This will help you figure out if the problem is with the hardware or the software.
- You may have to update your drive’s drivers. Go to the Device Manager and choose Disk Drives. Click on the ATA drive icon. You will find the Update Drive option here. Click on Search Automatically. If there’s an update available your drive will be updated.
- Sometimes, dirt on your CD and/or drive will interfere with the optical drive’s ability to read a CD’s contents. Try cleaning, both, the CD and the drive, with CD drive cleaning kits.
- If none of these tips help, consider replacing your drive with a new one. You might also consider using an external CD drive. They are more affordable and last longer than internal CD drives.
**Conclusion **
In this era of USB drives and the Cloud, you may prefer to avoid using a CD to share and read contents. Nevertheless, a lot of audio, videos, and software are still read and transferred through CDs. Whatever your preference, I hope you found this article helpful. Thanks for reading!

Tech enthusiast and founder of Technize. Passionate about making technology accessible and helping people make smarter buying decisions.