How to Speed Up Your Slow Laptop & Make Super Fast
Disclosure: This post may contain affiliate links. If you purchase through these links, we may earn a small commission at no extra cost to you.

Slow laptop performance happens to be the bane of many businesses and even individuals. We’re all too familiar with pressing a button to turn on the laptop only to find that booting takes over ten minutes!
Even then, opening up frequently used applications takes unusually long, especially compared to what other computers can accomplish or even compared to how fast your laptop was when you first purchased it.
As tempting as it may be to buy a new laptop just so that you don’t have to deal with all the nuances associated with getting some work done, often fixing speed issues is easier and cheaper.
When people ask, “how to improve laptop performance windows 10?” We often tell them that there are many approaches. You have the hardware upgrade approach, the debloating software approach, and the Windows 10 optimization approach.
Today in this article, we’ll walk through each one of these approaches, starting with the hardware approach!
Upgrading Your Laptop’s Hardware for Faster Load Times
One of the first things we recommend that people do to speed up their laptop is to upgrade the hardware. As it stands, each subsequent update to Windows 10 and even software that relies on the operating system makes it more resource-intensive.
While there are many reasons for apps and Windows 10 in general, becoming more resource-intensive, the most common reason is a lack of optimization and additional features. In other words, when someone asks us how to speed up a windows 10 laptop, we tell them to upgrade so that they can keep up with the resource-hungry software they use.
Upgrade to a Solid State Hard Drive (SSD)
 Upgrade to SSD to make your laptop faster
If you’ve purchased a laptop in the past three years, the chances are it came with a Solid-State Hard drive (SSD). SSDs are known for being exponentially faster than traditional platter-based hard drives, which mean Windows 10, installs in minutes, loads in seconds, and most programs like office apps load exponentially faster.
Upgrading to an SSD helps to speed up an aging laptop noticeably. While SSDs are more expensive per megabyte compared to their platter counterparts, they are faster, smaller, and lighter. Fortunately, installing one is also easy.
All you need is to open up the laptop, remove the platter hard drive, and install the SSD in place of it. Also, if your laptop comes with an optical disk drive, you can replace it with an SSD by using a caddy. Then copy all your files over from the old hard drive via an external drive enclosure, and you’re good to go!
If you aren’t comfortable opening up and upgrading your laptop’s hard drive, most professionals will do it for you too.
Add More RAM
 *Adding more RAM can speed up your laptop’s performance *
A lack of RAM means that the programs you use will have to rely on the swap file created on a Windows 10 laptop. If you have a slow laptop that uses a traditional hard drive, there will be a considerable slowdown. That said, even swapping from an SSD is far slower as compared to RAM. That’s why you’ll want to have more than enough RAM to handle your daily computing needs.
To know if you have enough RAM, press Ctrl+Alt+Del, then click ‘Task Manager’, and take a look at the ‘Memory’ column from the Performance tab of the screen. It’ll show the amount of RAM your computer is currently using. If you have all the programs and tabs (for web browsers) open like you usually do and it shows 100% usage, then it means you need more RAM. We’d recommend adding more RAM even if usage is around 80%, mainly because you’ll want to future-proof the laptop to a certain extent.
Now many of the tweaks we discuss in this article have to do with freeing up RAM, which is beneficial but not as much as adding 8 GB of it. If you have a laptop that came with 2GB or 4GB of RAM, adding around 8GB will help you extract some extra performance.
The drawback to adding more RAM is if you’re using a laptop that dates back to maybe 2010 or before, chances are you’re using a 32-bit version of Windows, which only accepts 3GB of RAM. So, even if you have 8GB of RAM, the system will only recognize 3GB. However, you can work around this with a fresh install of the Windows 10 64-bit version.
Software Performance Optimization
If you’re thinking about making your laptop run faster running Windows 10 and already have an SSD installed, the next step is to debloat your Windows 10 machine.
Remove Bloatware
 Remove bloatware to improve your laptop’s performance
Many new computers similar to older ones come with preinstalled bloatware by manufacturers. Older computers have bloatware that either auto-installs or is left behind from a previous software install; either way, it is slowing down your laptop. Removing this unwanted software from your laptop will speed things up considerably in our experience.
Old programs that you no longer use are also part of the problem, and we suggest you remove them. If you aren’t using Dropbox, Microsoft OneDrive, playing Solitaire, Minecraft, or using MS Access, then remove all of them. Not only will that free up resources, but it also translates to less stress on your laptop’s limited memory and processor.
Remove Malware

One of the ways how to make the laptop run faster is to remove malware. It is surprisingly easy to pick up malware on a modern computer with access to the internet. Not only does malware open your laptop up to potential malicious attacks, but it is a major drain of resources. However, it is trickier to remove malware than bloat from a laptop. Removing malware will require that you use a malware removal tool, some of which are free.
Some of the most popular and easy to use malware removal tools include Bitdefender, Microsoft’s Malicious Software Removal Tool (free), and AVAST amongst a few others.
Delete Unnecessary Resource Hogs
The first thing is to figure out which programs on your laptop are using the most resources. One way to speed up a slow laptop is to kill all the resource hogs you aren’t using. To do that, you need to run a file scanner to check how many old folders and files are on your computer. Plus, all excess data like cookies, caches, and temporary files cause the laptop to run slower.
Fortunately, there are many tools available that’ll help clear up all the clutter. The most popular and free to download is CCleaner. Avast owns it, so you know it is secure, and it is by people who understand how computer optimization works.
CCleaner works by crawling a computer’s hard drive looking for files that have not been used for a very long time, then it shows you a list, and you can then choose to delete them.
CCleaner is also an excellent tool for cleaning up the Windows 10 registry. Often a bloated registry with invalid entries can slow down a Windows 10 laptop considerably over the course of several months. Once the tool finds all issues associated with the registry, you can choose to either fix each one individually or let CCleaner fix all of them automatically. We suggest that you run CCleaner’s registry cleaner on your laptop every few months to keep the registry optimized.
Defragment Your Hard Drive

If you’re still using an old, mechanical hard drive, we can bet that it is fragmented. Fragmentation happens for many different reasons, but the result is often that your data is scattered across the drive platter’s physical surface. Now because the drive head has to travel much further and across various surfaces of the platter, reading all the portions of the data you want to access further slows down what is already a slow mechanical drive.
Defragmentation also referred to as defragging, works by restructuring the data on your disc so that all the bits that make up your data are on the same physical platter, i.e., grouped together. Doing this increases the speed of the hard drive. If you have an SSD (we recommend above), you do not need to defrag the hard drive.
How to Defragment your Laptop and PC:
-
Select the search bar on the taskbar and enter defrag
-
Select Defragment and Optimize Drives
-
Select the disk drive you want to optimize
-
Select the Optimize button
To check if your physical disk requires defragging, click on the storage tab in your Windows 10’s system settings, then click on ‘optimize drives.’ Doing this fires up the optimization wizard; it’ll then analyze all the drives on your machine and present you with a fragmentation report in percentage values for each drive. If your drive is more than 30% fragmented, we recommend that you defrag it the right way to improve performance.
Boost Memory with ReadyBoost
ReadyBoost is a nifty little tool and feature that Microsoft introduced originally with Windows Vista. It works by allowing a user to boost their system memory by using a flash drive as a swap drive.
While the ReadyBoost isn’t as effective as swapping on a solid-state drive or adding RAM, it does help to boost performance by a little bit, especially if you’re using a low-powered, old laptop with a few gigabytes of RAM. ReadyBoost works by setting aside part of the flash drive memory for caching, storing frequently used apps to open up faster and increase random read access speeds.
Using ReadyBoost is easy and only requires a USB memory stick inserted into a USB slot on your laptop. A dialogue box opens asking what you’d want to do with the flash drive; you can choose the option to use it for Windows ReadyBoost. You then get a window that asks how much of the drive you want to allocate for ReadyBoost. Our recommendation is to give as much as the drive or the entire drive.
Once you confirm all the settings, the window will close, and Windows will start using the drive. Each time you insert the USB stick, it’ll automatically be detected and used to boost performance slightly.
Note: If your laptop is already fast enough, Windows prevents the use of ReadyBoost since it does not see your system benefiting from it. However, if your system suffers from a lack of memory, ReadyBoost will work wonders, especially on a USB 3.1 port coupled with a USB 3.1 optimized memory stick.
Disable Unnecessary Windows Animations
Windows 10 eye candy is considerably resource intensives. Since Windows Vista, Windows as an operating system has become increasingly cluttered, and their fancy graphics with animated flourishes take their toll on aging systems. Since the eye candy does nothing to improve productivity, Windows 10 disables a few of these animations by default on less powerful systems. However, if you’re OK with sacrificing some aesthetic appeal for speed, it is possible to switch off all the graphics and run the operating system on your laptop with its bare essentials.
 Adjust Windows animations for best performance
To disable the animations, go to Windows 10 Search Menu, then type “Adjust the appearance and performance of Windows” (without the quotes). Then click on the feature in the dropdown list. You’ll want to unselect everything you don’t want to see or don’t care about, like shadows, smooth fonts, etc. Then click OK to save changes. The result is that Windows 10 will look like a dated operating system but will perform exponentially better.
Remove all Web Results from Your Windows 10 Search
One of the best features of Windows 10 and something Microsoft touted about the operating system was its search indexing improvements. The feature works by creating an index of all the files and folders on your laptop, along with metadata for images, videos, etc. Doing this speeds up the process of finding the files you need using the built-in search feature. The search feature in Windows 10 is a radical improvement over previous versions, but it can be further optimized for aging systems for improved efficiency.
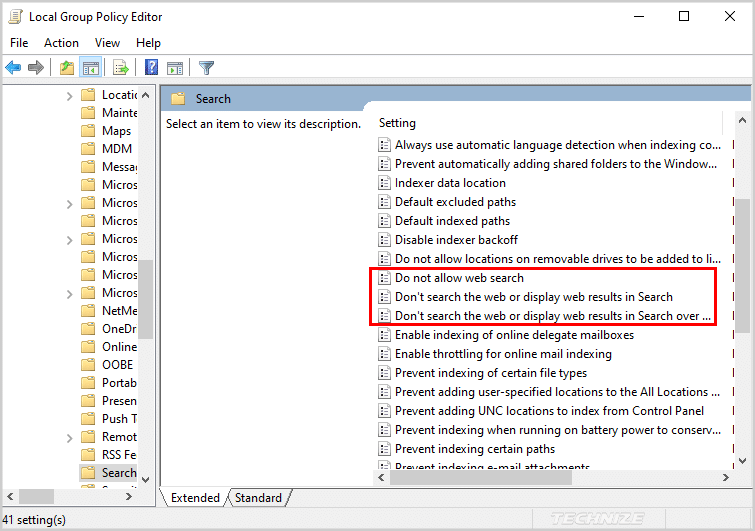
The first step would be to disable the web results you see in the Windows 10 search menu because 99.9% of us use a web browser when we want to search for something. To remove this feature, go to the search bar below on your desktop and type “gpedit.msc” (without the quotes), which brings up the Group Policy Editor. Then click on Computer Policy > Computer Configuration > Administrative Templates > Windows Components > Search.
You’ll want to find policies ‘Do not allow web search’, ‘Don’t search the web or display web results in Search’ and called ‘Don’t search the web or display web results in Search over metered connections.’ Each one can be double-clicked to edit and to set preferences. After disabling the features, restart the laptop for the changes to take effect. You’ll now not see any web results or suggestions in the system search bar.
Limit the Number of Programs on Startup
One of the questions we get from laptop owners is, “how to speed up a slow laptop that takes forever to load Windows?” One way to do it is to reduce the number of applications that run each time your PC boots up. Windows 10 updated Task Manager now makes it easier than ever before to choose what runs in the background and what can start as windows boots.
To limit the number of programs that start at boot time to the bare minimum, do the following:
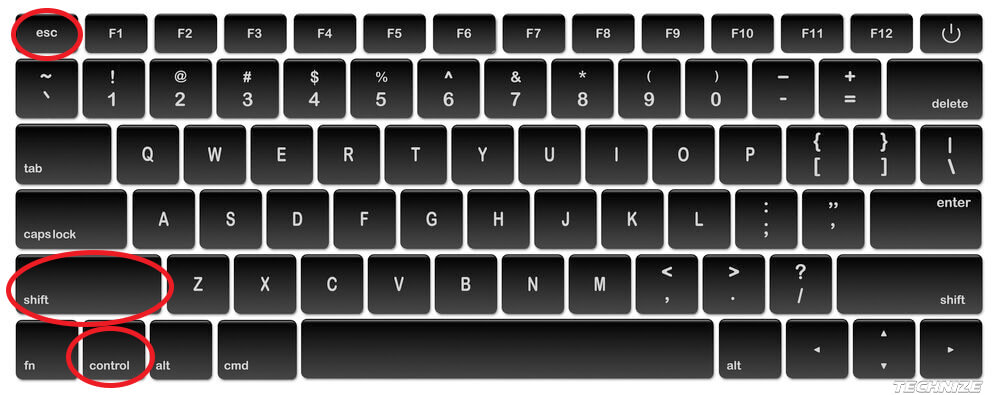
- Press Ctrl+Shift+Esc which will bring up a box with all the applications called the “Task Manager.” It also shows you available RAM, hard drive, and network usage stats.
- You’ll want to disable apps that have the most impact on your Windows 10 boot-up sequence. To check, you click on the ‘Startup’ tab in “Task Manager.” Then take a look at the ‘Startup Impact’ column on the right. You’ll want to disable all apps that have a “high” impact.
- To disable an app, right-click on it and click ‘disable.’
Close Programs in the System Tray
Programs that you see running in the system tray are ones that are in RAM and taking up valuable resources. The more programs you have in the System Tray, the slower your laptop will be, especially if it is running on a resource-stricken computer.
Right-click on the programs you don’t need and aren’t using right away and click ‘close’. If you need to use the programs again, fire them up like you would any other program.
Adjust Your Laptops Power Settings
Your Windows 10 laptop most likely came with several ‘power plans’, each one with a slightly different objective. However, the default is always often set to ‘Balanced’, which may work for most laptops but not necessarily yours. That said, if your computer is running on battery power only, then its power draw should be of concern or if you’re trying to save on electricity consumption. If that’s the case, you can switch to the ‘battery saver’ plan, which lowers system performance and screen brightness to save power.
You won’t want to choose the Power Saver plan if the laptop is already slow because it significantly reduces performance to save energy. Instead, choose the High-Performance plan. While it’ll use more energy, it helps ensure that the processor and all related parts are working at their optimum levels, consequently speeding up the machine.
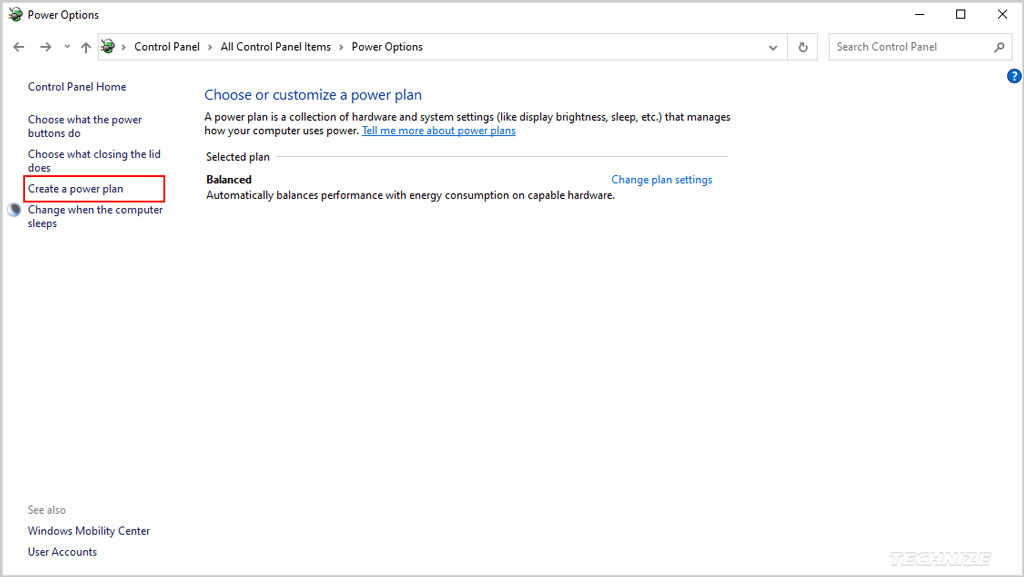
Now, apart from the standard options, you can also create a plan of your own. Start by going to Control Panel>Hardware and Sound>Power Options>Create a power plan, enter a plan name, and hit ‘next’. You can set options like display brightness, how long you want the display to stay on when the laptop is inactive, and how long should Windows 10 wait before switching to sleep mode.
Disable Cortana

While we find Cortana to be a handy feature, it is resource-intensive and has privacy issues surrounding it too. Fortunately, it can be easily removed by following the steps below:
- Go to the ‘Search box’ below on the desktop and enter **Edit group policy. **
- Go to** Computer Configuration** > Administrative Templates > Windows Components > Search.
- You should see ‘Allow Cortana’, double click and open it.
- Click ‘Disabled’ and then ‘OK’.
Disable Automatic Updates
Usually, we wouldn’t advise that laptop owners disable Windows 10 automatic updates since they are the best way to ensure that programs and the operating system are updated with the latest security patches. If security and updates matter to you, then this option shouldn’t be disabled.
There are some cases when you should consider disabling automatic updates, but only after you’ve exhausted all other optimization techniques in this article. You’ll also want to disable automatic updates if your laptop also functions as a gaming machine. Game distribution platforms like Epic Games Store and Steam will run updates and patches in the background; often these updates run north of several hundred megabytes. The same goes for Adobe’s Creative Suite, which tends to update in the background and consequently slow down the laptop.
When you turn auto-updates off and updating only when the software is used, you can be assured that the updates aren’t getting in the way of actual productivity. However, we’d strongly advise that you allow critical software updates such as those by Windows 10 and antivirus programs run on autopilot. Though if you lack the headroom, those can be disabled and then enabled later on, like over the weekend or at night, so that the updates can run when the laptop isn’t used.
Conclusion
We’ve run through just about everything you can do to improve your laptop’s performance. However, the improvements yielded aren’t going to be more than maybe 60% hardware and software included. That said, if you use the laptop for more processor and RAM-intensive tasks like video editing or 3D design, it might be time to upgrade to a new machine.
If you just want to extract a few more years of life from your existing laptop, the above will work wonders depending on how old your system is and the last time you ran any of the procedures above.

Tech enthusiast and founder of Technize. Passionate about making technology accessible and helping people make smarter buying decisions.