Why Does My Laptop Keep Going to Sleep?

Disclosure: This post may contain affiliate links. If you purchase through these links, we may earn a small commission at no extra cost to you.
If you’re here, it is because your laptop randomly goes to sleep when you step away from it; say to pick a call or even feed your dog.
It is impossible to stay glued to your screen for the whole day. At some point, you will need a short break; and you come back only to find your laptop’s screen off.
So you keep wondering why it keeps doing this.
You probably think that it is damaged because sometimes it sleeps even when programs are running.
Are you worried that you might need to buy a new laptop? Don’t be; you can easily fix this problem today. We’re going to show you how.
Check Basic Settings
It could be that your laptop goes to sleep after a short period of inactivity because that is what it has been set to do.
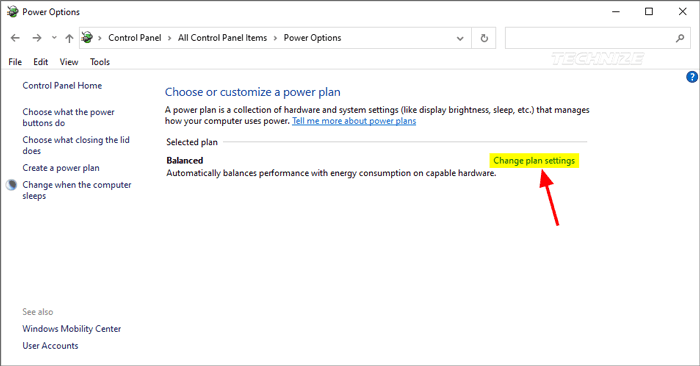
In your Windows 10 laptop, open the Control panel. You can do this by searching for it on the taskbar’s search box.
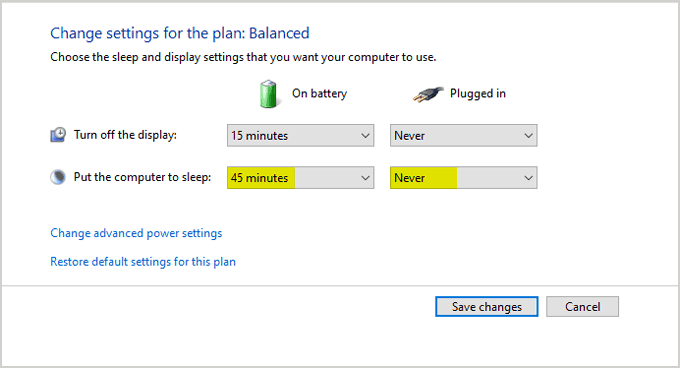
Click on System and Security, then Power Options. Then click on Change plan settings.
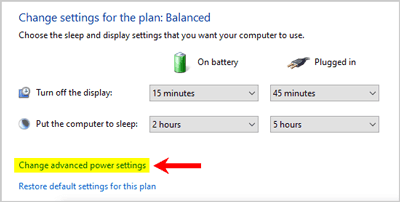
You’ll be able to see after how many minutes of inactivity does your laptop go to sleep. You can change this to the value you will prefer. As you can see, mine is set to 45 minutes.
If your laptop sleeps when you close the lid, read our post on Why your Laptop goes off When Unplugged and find out why it does this and how to solve this.
Using Registry Editor (Regedit)
When your laptop goes to sleep, even when programs are running, this is the guide you should follow.
When your laptop does this, it means that there is an error that needs to be fixed. You can fix this error by revealing a given hidden setting.
This one is slightly advanced, but I will make it as simple as possible. Do not try to understand the characters; simply follow the steps, and you can bet your parents’ pension that you will have this problem fixed.
We will use the Windows Registry Editor (Regedit), a graphical tool that enables you to see and change those hidden settings.
Regedit only allows authorized users to make changes to system settings. So you need to be signed in as an administrator first.
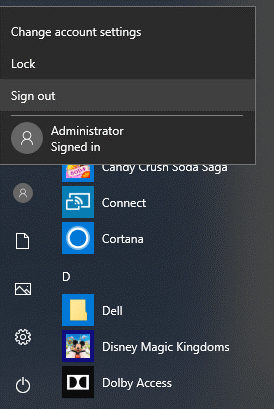
To do this, start by clicking on the startup menu on the taskbar and clicking on the currently signed account. Next, click on Administrator and wait for your laptop to sign you in. This usually takes around 2–5 minutes.
Once you are signed in as an Administrator, search Regedit on the taskbar’s search box, right-click on it and select Run as administrator.
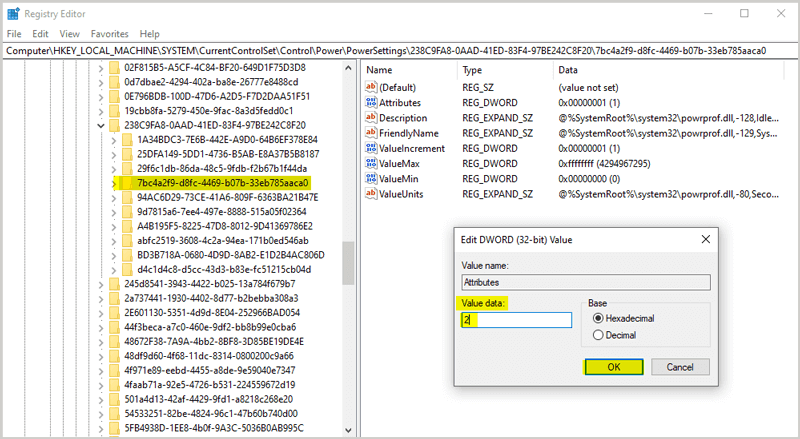
In regedit, go to the following key, or follow the steps below:
HKEY_LOCAL_MACHINE\SYSTEM\CurrentControlSet\Control\Power\PowerSettings\238C9FA8-0AAD-41ED-83F4-97BE242C8F20\7bc4a2f9-d8fc-4469-b07b-33eb785aaca0
First, click on HKEY_LOCAL_MACHINE to expand it, and then click on SYSTEM.
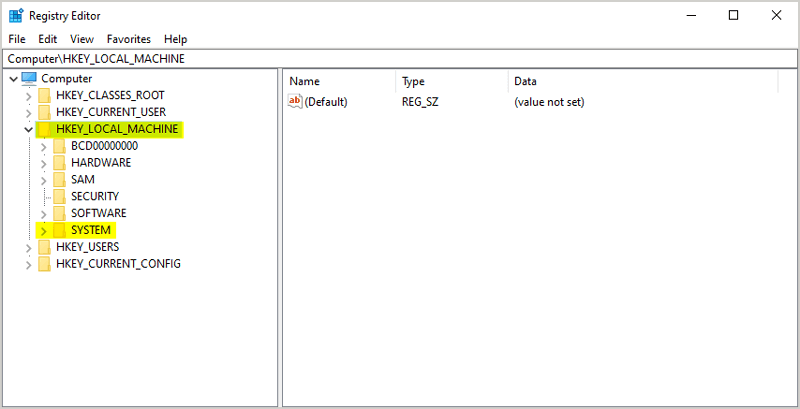
Next, please scroll down to CurrentControlSet and click on it.
Under this, click on Control, then scroll all the way down to Power and click on it.
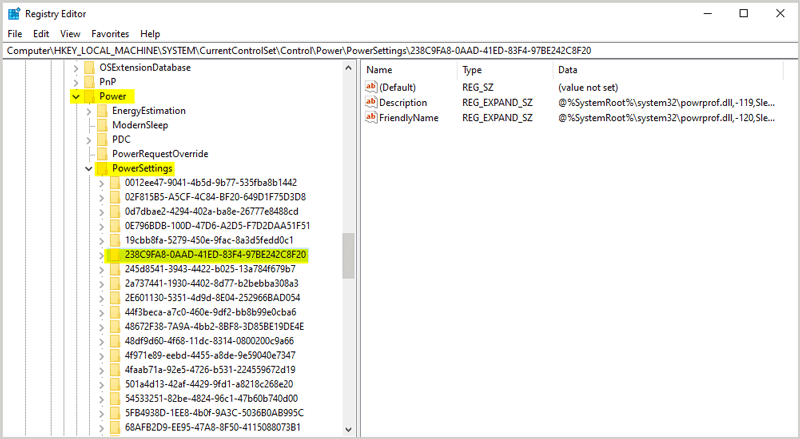
Under Power, click on PowerSettings. At this point, you should see multiple files labeled using a combination of numbers and letters, just like MAC and IP addresses.
This is where it gets tricky. We are looking for a file with specific characters.
Look keenly for a file labeled with these characters: **238C9FA8-0AAD-41ED-83F4-97BE242C8F20 **and double-click on it.
The files are slightly different, so look for the one that starts with the number 2 and proceed to match the following characters.
Under this file, look for another one with the following characters: **7bc4a2f9-d8fc-4469-33eb785aaca0 **and click on it.
To your right, double-click on Attributes and a smaller window will pop up. On this window, under the value data, you should see the number 1 in the box. Change this to 2 and click OK. Then close regedit. Be assured that this will not harm your laptop somehow; it will just enable an option under the power settings.
Now go back to the usual settings by clicking on the **Start **button and select Settings. You can also access this by clicking on the battery icon and selecting battery settings.
The easiest way would be to press the **Windows+R **keys simultaneously and type control and click OK.
 Windows 10 Power Options
Click on Power Options.
It is recommended to have your power option set to balance, but sometimes this shuts off some processes unexpectedly; you can have it at ultimate performance.
On your selected power option, click on Change power settings, then Change advanced power settings on the next window. A smaller window will pop up.
Please scroll down to Sleep and click on it. You should see this option System unattended sleep timeout click on it and check the time it has been set to.
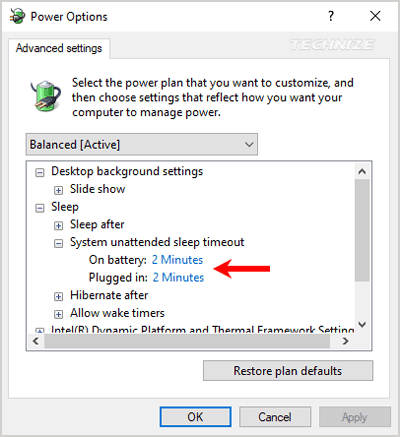
It usually is 2–5 minutes, which is why your laptop goes to sleep after this time, even when programs are running. So what you have been doing all this time since you ran regedit as an administrator is to reveal this setting.
So now you can change this setting to a larger number and click OK to confirm. Now when you leave your laptop unattended, it won’t go to sleep until the time you have set is reached.
Accessing the admin account in this way renders it not password protected anymore. Remember to sign out of this account or assign a password to it to protect it.
Conclusion
By now, you should already know why your laptop keeps going to sleep after a short period of inactivity and how to solve this problem.
Suppose it does this because you closed the lid, check the usual power options settings and fix it easily.
If this happens when the lid is open, and programs are running, use the Windows Registry editor to fix it. Be careful not to alter other files under regedit apart from the ones we have mentioned; you might make an irreversible change that might require you to get another operating system.
If any of the files mentioned are missing, contact a professional to assist you with this problem.
Did you enjoy this tutorial? Please inform us in the comments sections if you were successful.

Tech enthusiast and founder of Technize. Passionate about making technology accessible and helping people make smarter buying decisions.