How to Upgrade a Laptop RAM: Detailed Instructions
Disclosure: This post may contain affiliate links. If you purchase through these links, we may earn a small commission at no extra cost to you.

Most laptops come with 2-4 GB RAM installed. This is rarely enough to run all the processes you would want to. Eventually, your laptop starts slowing down when you run multiple processes.
You might be only doing basic stuff like browsing the internet, watching YouTube videos, or reading awesome articles like this one but still experiencing performance issues.
This is why some manufacturers provide extra slots to upgrade your laptop’s RAM. So stick around and let us show you how.
Basics of RAM
By now, you should already know what RAM stands for; Random Access Memory.
You might be wondering why your laptop needs RAM (temporary storage) when it already has ROM (permanent storage) with a much larger capacity.
RAM determines your PC’s performance by temporarily storing files to be quickly accessed by applications when you open them.
More RAM means you can store more files; hence you can run multiple processes without your PC slowing down.
It is even more helpful when running heavy software, such as games, because they require more files.
This type of software is useful up to a certain limit, which we’re going to discuss later.
How to check the amount of RAM installed on your PC?
Before you even think about upgrading your RAM, you need to know just how much RAM is already installed in your device.
Here’s how you do it.
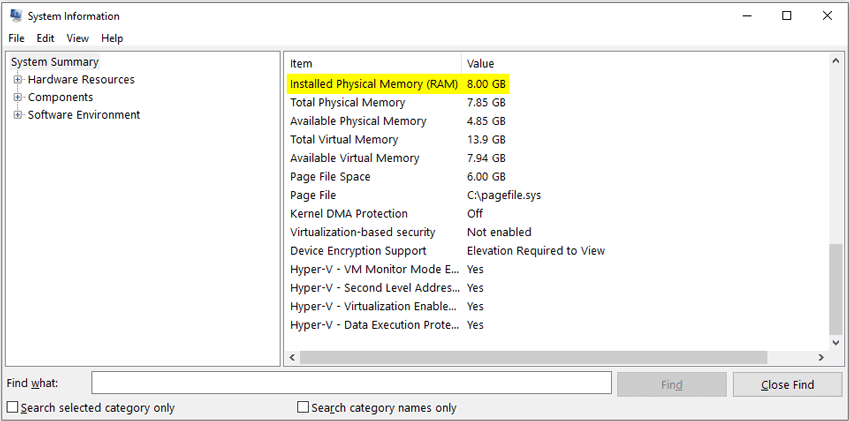
Start by pressing the **Windows **and R keys. Type **msinfo32 **in the search box that appears and press enter.
Scroll down to where it says Installed Physical Memory (RAM) and check the value on your right.
Things to Consider Before Upgrading RAM
When you want to upgrade RAM you should first reflect on the following.
How Much RAM do you need?
It depends on what you want to do with your laptop. If you’re doing basic stuff like browsing, watching videos, etc. I would recommend at least 8GB RAM.
4GB RAM sometimes becomes overwhelmed when you open multiple tabs on your browser.
If you’re running games, then a minimum of 16GB is recommended. Most games require RAM slightly below this value.
If you want to upgrade up to 32 GB, the extra RAM will not affect your gaming performance.
Read our post on What to look for in a Gaming Laptop to learn more about this.
How Much RAM are you Actually Using?
Your laptop slowing down could be due to multiple causes.
Before you come to a conclusion that running low on RAM is causing this, you need to know how much RAM you’re using.
Press the **Ctrl + Alt + Delete **buttons at the same time and click on task manager.
Click on the Performance tab and then Memory to the left of this window.
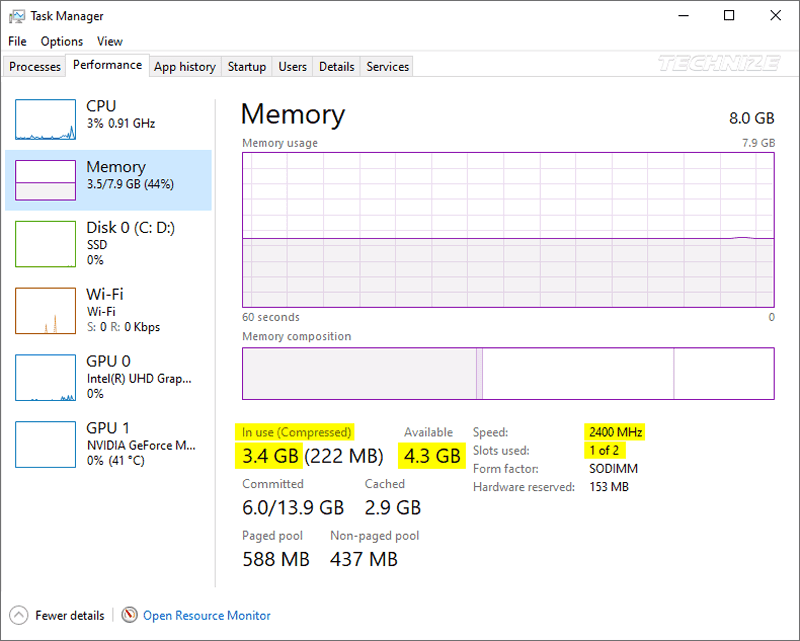
As you can see, I am only using about half of the installed RAM (3.4/8 GB), so I don’t actually need to upgrade my RAM.
If the value is much closer, say 7GB, then you need to upgrade your laptop’s RAM.
The performance speed also needs to be high.
Under slots used, it says ‘1 of 2’, and this means we have one slot we can use to insert an additional RAM module.
If it had said ‘2 of 2’, then it means there is no slot available for additional RAM to be inserted.
How do you know if you can Upgrade Installed RAM?
Some types of RAM are not compatible with your device.
In the same way, there are limits to which you can upgrade your laptop’s RAM.
So how do you know this?
Crucial Advisor tool scans your system and provides you with information on the types of RAM that you can install into your device and the limits.

First, go to Crucial’s website. You can go manually if you know all of your computer’s details like manufacturer, brand, etc., but I would advise you to agree on their terms and conditions and let it scan your computer for these details.
Click on ‘Start your scan’ and agree to terms and conditions on the next page.
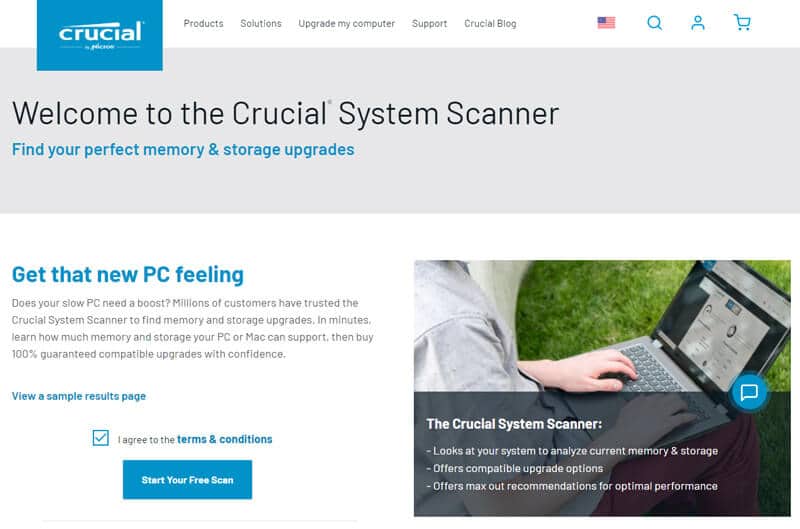
A small file will be downloaded; once it is done, right-click on it and select ‘run as administrator’.
Let it scan and display the results consisting of the name of your device and compatible upgrades for memory, storage, and chipset. We’re only interested in memory.
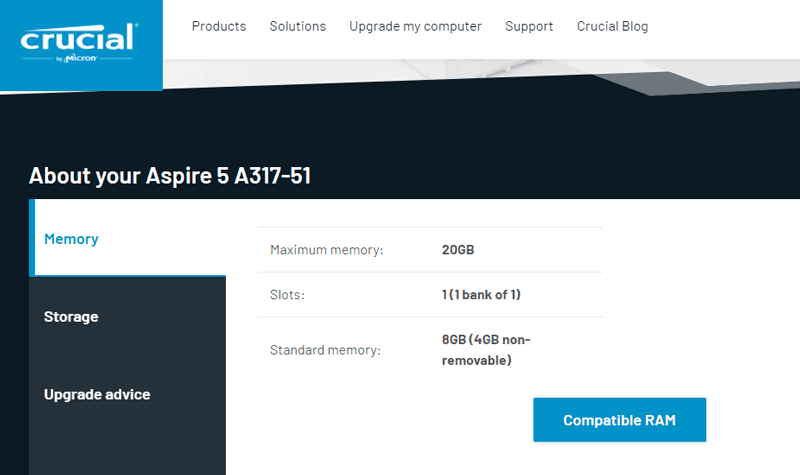
Click on compatible RAM and you will be taken to a page containing a list of all the types of RAM compatible with your device and their prices.
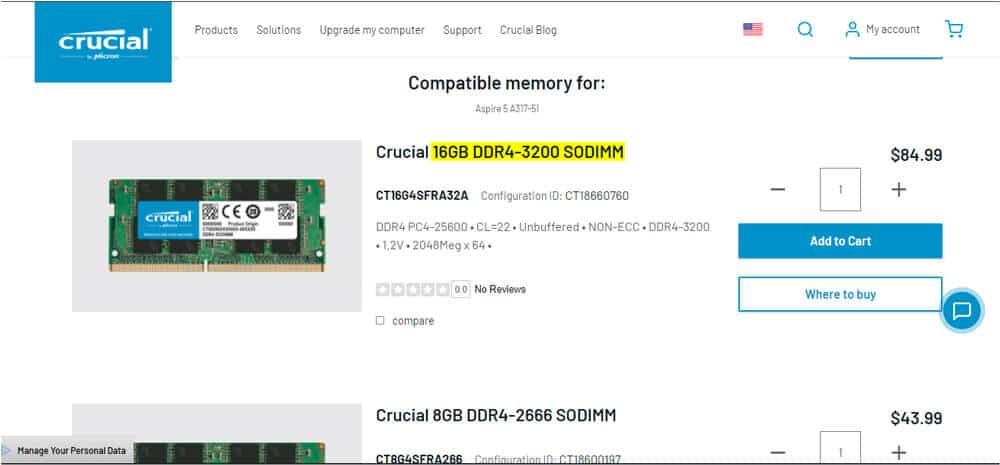
You can choose to purchase directly by clicking on ‘add to cart’ and proceed, but I recommend that you do this from amazon. Amazon has the best deals for RAM.
To find this exact model, select memory’s name without the ‘crucial’ part (highlighted) and go search for it on amazon.
Crucial has been around for a while and has a great reputation. I must inform you that if your PC has been custom-built, there is a likelihood that you will not find a match for compatible upgrades. In this case, you should contact their support team for further guidance.
What is your Budget?
Of course, you cannot buy RAM going over your budget. If you’re on a strict budget, you should opt to go for a memory of lower capacity.
You can get a 16GB laptop RAM stick for less than $100 and 8GB RAM for less than $50.
Upgrading to 4GB RAM is not that useful, so I wouldn’t recommend it.
How do you install this RAM on your Laptop?
After you have purchased this upgrade, now it’s time to install it.
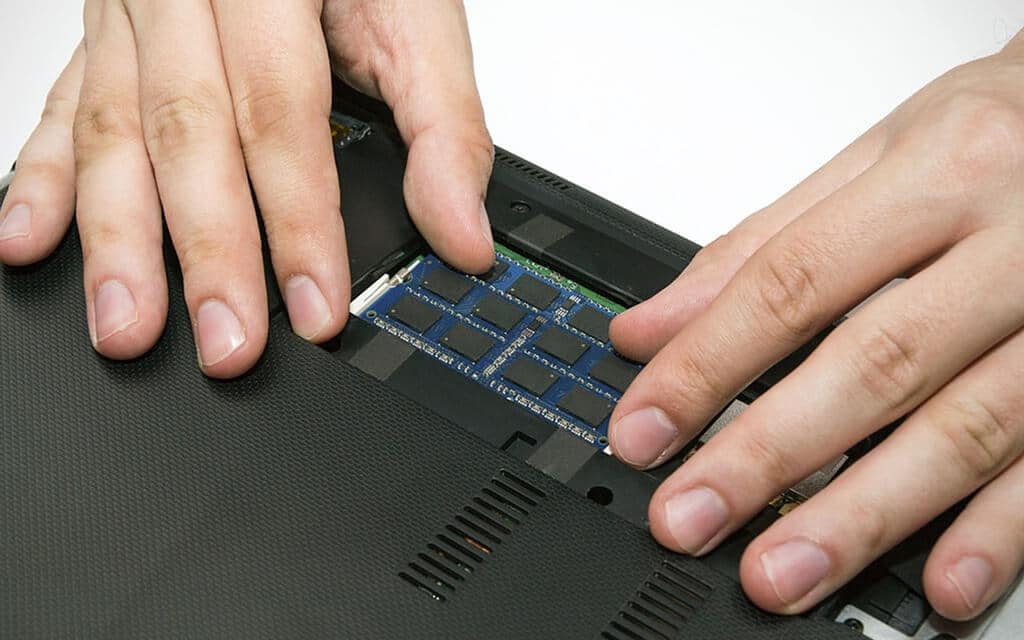
Installing RAM will require you to unscrew your laptop, remove the current RAM chip and insert one with more memory.
Different laptop brands have their own procedures for how you can do this.
I will show you an example of how this can be done using Acer Aspire A515-51.
I am choosing this brand because most of the Acer laptops allow you to upgrade the RAM by un-screwing a small compartment and not opening the whole thing.
Some brands will require you to unscrew the whole bottom casing of your laptop. With these brands, it is best to let a professional handle this for you.
Start by shutting down your laptop, flip it upside down, and take the battery out.

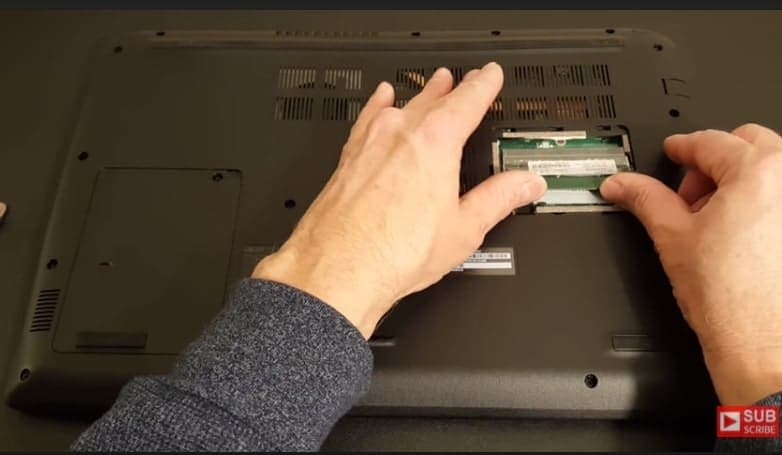
Like I mentioned, this laptop brand has a small compartment isolated for RAM and here it is.
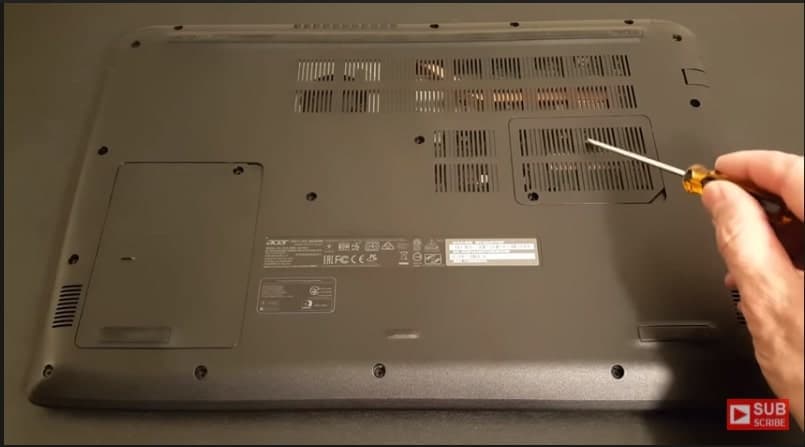
You’ll need a screwdriver whose end matches the crown of the screw (could be a star, chisel tip, or another one).
Proceed to unscrew the screw holding the lid in place in the clockwise direction. Using your elementary school knowledge of physics, use this screwdriver as a crowbar to lift the lid.
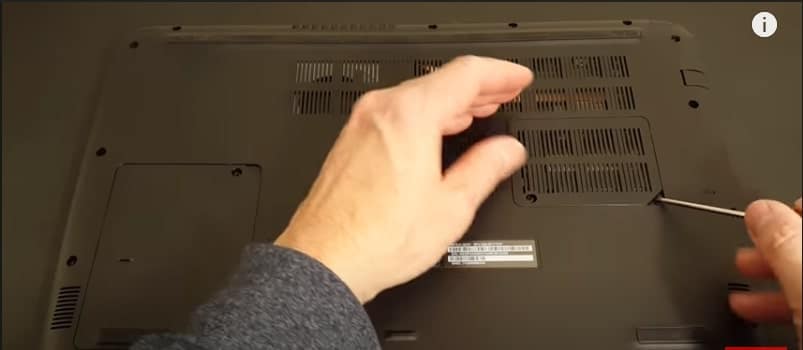
Place it at the opening on the bottom right corner and push it downwards. Then slide it across towards the left and then pull the lid out.
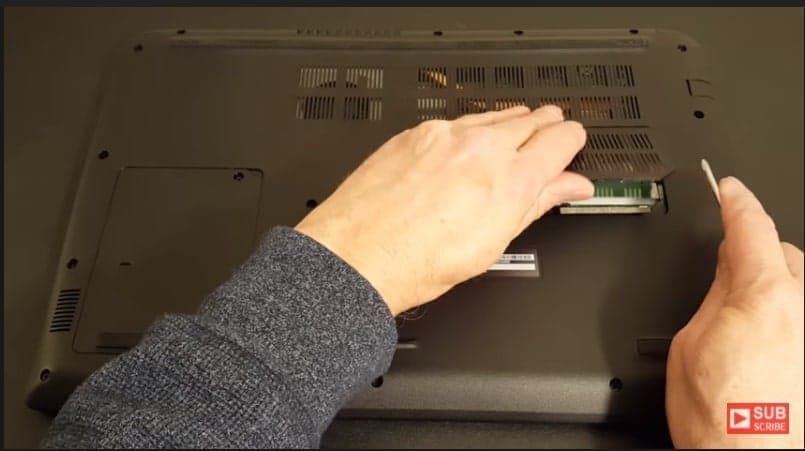
Take care not to lose the screw(s) or drop it inside the laptop because you would have to open it up to get it. Now you can proceed to remove the RAM chip that was previously installed.
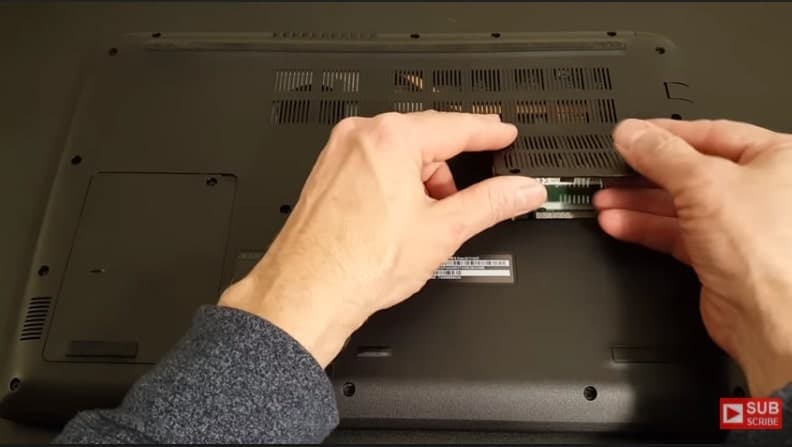
There are clips at both ends that hold it in place. Place your thumbs on these ends and push those clips to opposite sides. There might be a transparent plastic covering it; remove it.
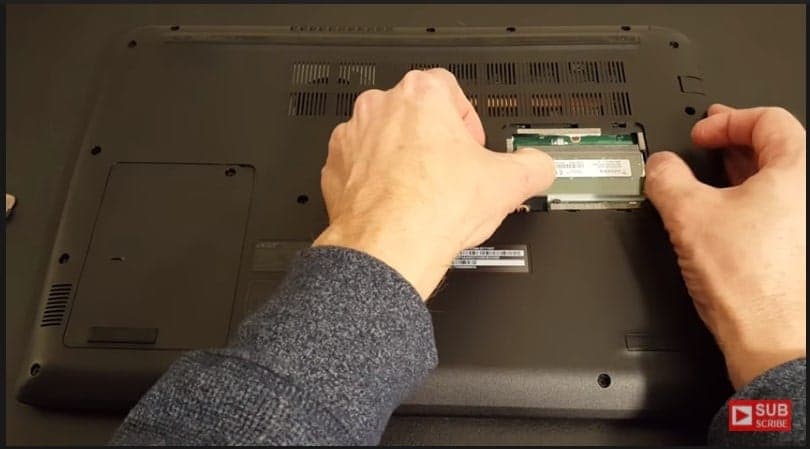
Pull the RAM chip out gently once you feel that the clips are not holding it anymore.
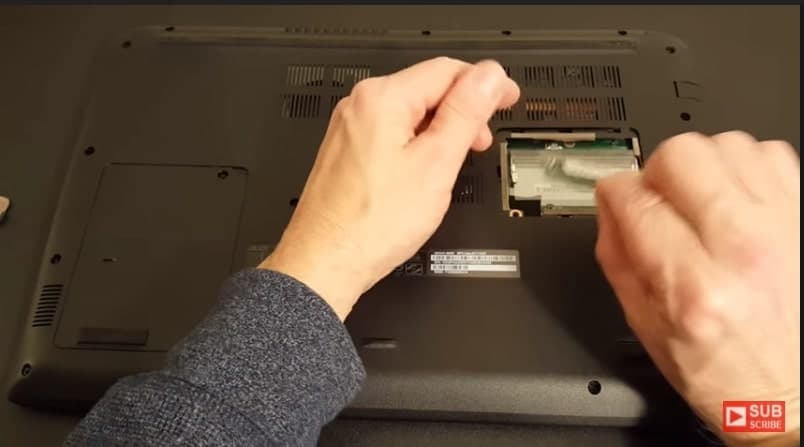
Now you have already removed the previously installed RAM. Observe it and take note of which side has the long and short grooves. This will determine how you will place the new RAM stick back into the memory slot.
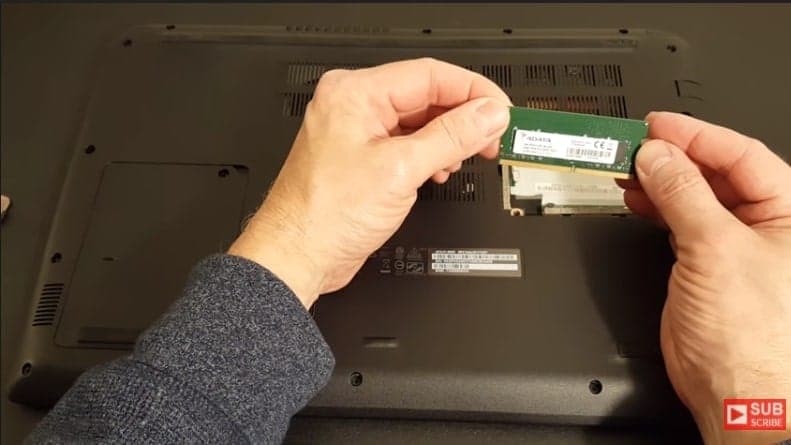
Unwrap the new memory stick. Align it with how the longer and shorter groves had been placed in the previous stick.
Suppose this stick does not align like the previous one; it means the stick is not compatible and you have to contact your vendor for a replacement.
Before you insert it, make sure it is almost identical to the previous one.

Insert the new memory stick in the slot. You don’t have to worry about the clips on the left and right edges.
Once it is in, they will automatically lock-up and hold it in place. Put the transparent covering back over this new stick.
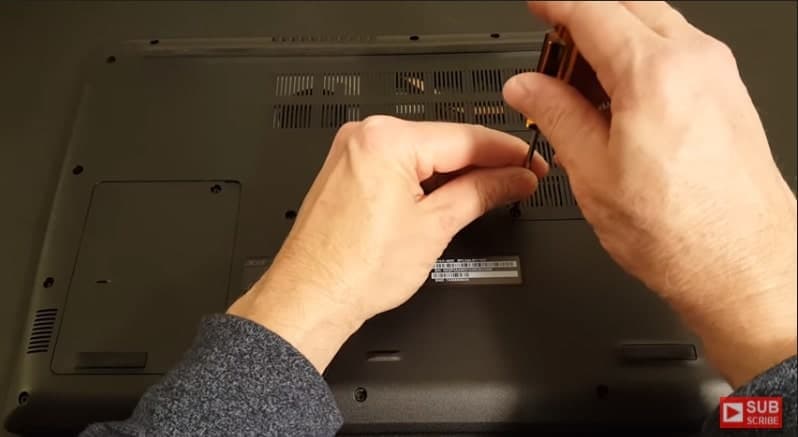
Pick up the lid and place it back on top of the transparent covering.
The lid has snaps that will hold it in place before you put the screw. Put the screw back and fasten it in an anticlockwise direction using the screwdriver.
After this, flip your laptop, open the lid and press the power button.
Once it has powered up, right-click on the desktop window and click on refresh. Do this at least 2 more times.
Now go back to system information to find out if the RAM you have just installed has reflected.
Press Windows+**R **buttons simultaneously and type msinfo32 and click OK. Scroll down to Installed Physical Memory; to your right, it should read the value of memory you have just installed.
Until next time
If you tend to run multiple processes on your laptop simultaneously, upgrading RAM will definitely make your laptop faster.
If you’re running only basic tasks, the minimum recommended amount is 8GB. If you’re running high-end software, such as games or video editing tools, then you should have at least 16GB of RAM installed.
If you’re only concerned with performance speed, you might want to consider things like overclocking, clearing temporary files, etc.
Upgrading RAM doesn’t have to take a lot of time, especially if you know what to do. We would like to know if you enjoyed reading this article. Leave a comment below and inform us if you were successful in upgrading your laptop’s RAM.

Tech enthusiast and founder of Technize. Passionate about making technology accessible and helping people make smarter buying decisions.