How to Fix Wrong Laptop Time and Date?

Disclosure: This post may contain affiliate links. If you purchase through these links, we may earn a small commission at no extra cost to you.
Even as you read these words, your laptop might be displaying the wrong time/date. Laptops automatically sync time and date, but occasionally, they may display the wrong time due to a system glitch.
Now, this might not be a big deal (I mean, you probably have numerous devices that display the time on them). Nevertheless, it can be annoying to have the wrong time displayed on your laptop. Therefore, I have written this article, to help you fix (quite easily, I might add) this small problem.
Why Is My Laptop’s Time Wrong?
Generally, a laptop syncs its time and date according to the time zone. However, you may find that your laptop time is wrong because your laptop’s system cannot reach the required server. This may happen because your laptop is not connected to the Internet. If such is the case, check your Internet connection. If the connection is fine then the problem lies elsewhere.
If you are traveling, your laptop might be unable to detect the correct time zone. Also, there are some places where time zones are disrupted, so, in those places, your laptop may show the wrong time. If neither of these applies to you then it could be that the time zone setting is turned off, resulting in your laptop being unable to sync the correct time and date. ****
How to Fix the Wrong Time and Date in a Laptop
Because most laptops feature Windows 10, I will explain how you can fix this issue in Windows 10.
Step 1: In the task bar ribbon, locate the clock icon—Right-click on it. You will see a list of various options, including Adjust date/time. Clicking on it will take you to the Date & Time in your Settings. From there, you can change your time/date.
Another way to change the time and date on your laptop is to locate and click on the Windows icon (this is also on the task-bar ribbon). Next click on **Settings. **Then click on Time & Language option which will take you to the Date & Time in your Settings.
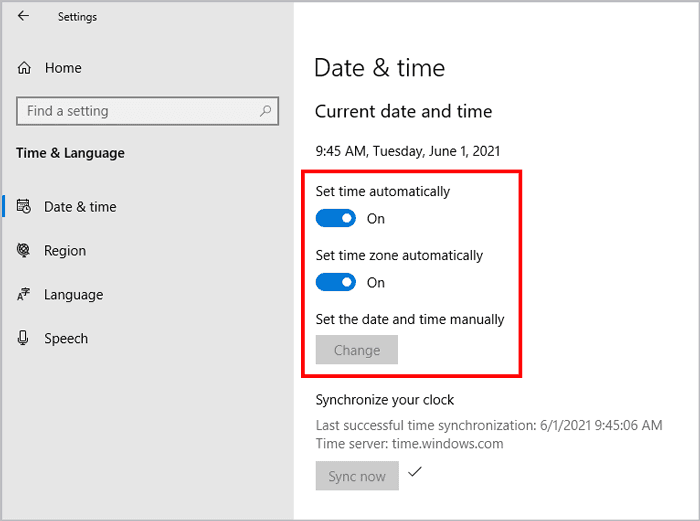
Step 2: In Date & Time settings you will see another option: Set time automatically. You can toggle the switch from off to on (the button will turn blue when you do this).
(Note: There is another option: Set time zone automatically. You can also toggle its switch, in which case, the time and date will be synced according to your time zone.)
Step 3: If you don’t want to use either method, here’s another way to change the time and date. Turn off the **Set time automatically **and Set time zone automatically options. Next, click on the change button; a pop-up will appear. Set your preferred time and date in the box.
Syncing the Time and Date of a Laptop to the Internet Server
As I mentioned before, your laptop might display an incorrect time/date when the** Set time zone automatically** option is turned off. In that case, you should connect to the Internet server. To do so, follow these steps:
Step 1: Go to the corresponding setting to sync your laptop time to the Internet server. There you will find the Additional Date, time & regional settings option.
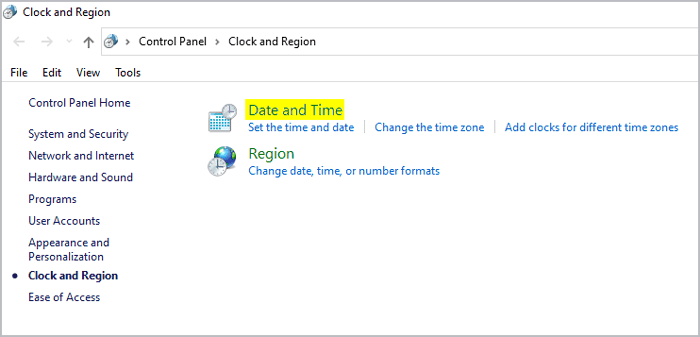
Step 2: Click on the** Date and Time** option; a pop-up box will appear. You will see a tab that reads **Internet time, **press it. Then, you will see the Change settings option. Click it.
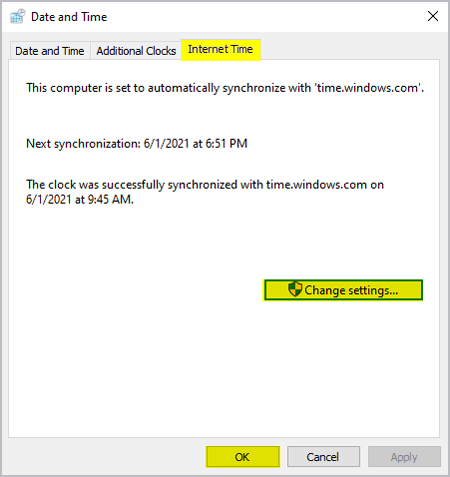
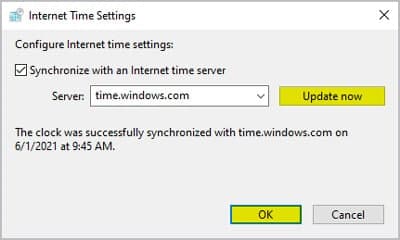
Step 3: Another pop-up box that reads Internet Time Settings will appear. Select the appropriate server from the drop-down list (by default, there will be a server named time.windows.com). After selecting your preferred time zone from the list, your laptop will automatically be updated with the new time and date.
Check if Windows Time Service is working
To check your windows time service status, do the following:
Step 1: Locate the **Search **bar on the task ribbon. In the Search bar, type services.msc and press Enter. You will be taken to the Services Manager. There, you will see the Windows time option. Double-click on it.

Step 2: Check if the startup type is **Automatic **and if the service status is set on Started.
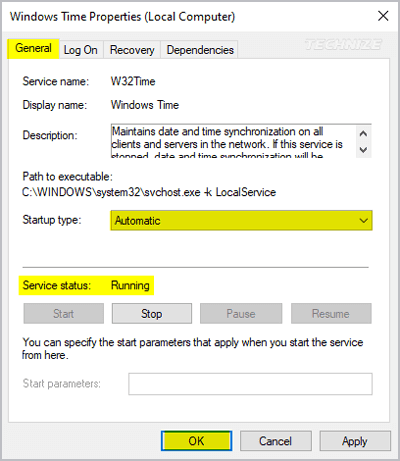
Step 3: Now, if your laptop is displaying the incorrect time, you will see that the service status is set to Stopped. If so, you will see a Start button below this. Click on the button to restart the Windows time service. Again, there will be a few pop-ups, just click OK or Apply to proceed.
Final Words
I hope you now understand why laptop timers get wonky and how you can fix them. The methods provided should fix your laptop’s timer; however, if they fail to do so, check if your laptop’s CMOS battery is drained. To do this, run a thorough checkup via your laptop’s servicing center. Hopefully, the CMOS is fine. If not, you will have to take further steps to replace the battery.

Tech enthusiast and founder of Technize. Passionate about making technology accessible and helping people make smarter buying decisions.